WIP- 1/2 Studio Scale TOS Battlestar Galactica

HARDWARE MODELING! With a focus on Sci-Fi, Fantasy, and Concept Vehicle and Hardware subjects, including props, robots and automata

Moderators: tay666, Moderators

Message
Author
aussiedave
Earl of Epoxy
Posts: 1786
Joined: April 28th, 2005, 11:57 pm
Location: Brisbane, Australia

Re: WIP- 1/2 Studio Scale TOS Battlestar Galactica

#21 Post by aussiedave »

Love seeing your WIPs. Thanks for sharing all the pics, etc.

Does a kit like this come with instructions?

Does it come with the lighting kit? And instructions? How do you know where all the lights are to be placed? I'm not a big Battlestar Galactica fan. Nothing against it, but you can't watch everything on TV :D

Or is this meant for fans of the show who know every square inch of what that ship looks like? I'd love to tackle something like this one day, but at the moment, I just watch in awe!
User avatar
DNA
Registered Seller
Registered Seller
Posts: 676
Joined: May 18th, 2005, 2:14 am
Location: Texas

Re: WIP- 1/2 Studio Scale TOS Battlestar Galactica

#22 Post by DNA »

Thanks everyone for the comments. This kit does not come with instructions and lighting is the builders option so no lighting kit. You can look at pics of the studio scale model on the internet and see where 95% of all the parts go. Mike Salzo, the creator of this kit is doing a build thread on therpf.com site and I will go there if I have any questions on the last 5%. Robiwon started his build here and I've picked his brain on some details. He gave me this link http://www.smallartworks.ca/Battlebuck/ ... /BigG.html to help me with where the fiber optics go. This kit is for any fan of the Galactica and you don't have to know every detail of the ship to build it because I don't know that much about it. Thanks again!
aussiedave wrote:Love seeing your WIPs. Thanks for sharing all the pics, etc.

Does a kit like this come with instructions?

Does it come with the lighting kit? And instructions? How do you know where all the lights are to be placed? I'm not a big Battlestar Galactica fan. Nothing against it, but you can't watch everything on TV :D

Or is this meant for fans of the show who know every square inch of what that ship looks like? I'd love to tackle something like this one day, but at the moment, I just watch in awe!
aussiedave
Earl of Epoxy
Posts: 1786
Joined: April 28th, 2005, 11:57 pm
Location: Brisbane, Australia

Re: WIP- 1/2 Studio Scale TOS Battlestar Galactica

#23 Post by aussiedave »

Thanks DNA! I really appreciate the lengthy reply. Look forward to seeing some more progress. Good luck with the remainder.
User avatar
DNA
Registered Seller
Registered Seller
Posts: 676
Joined: May 18th, 2005, 2:14 am
Location: Texas

Re: WIP- 1/2 Studio Scale TOS Battlestar Galactica

#24 Post by DNA »

Small update:

This 1/4 tubing slips over the 5mm LEDs pretty snug, but I added heat shrink tubing to make sure it doesn't slip off.

Image

And here's the LED test. The fiber optic bundle just slips into the other end of the styrene tube and pushed all the way in until it touches the LED (did not use heat shrink tubing on the fiber optic side as the heat may melt the fibers).

Image Image Image Image
User avatar
DNA
Registered Seller
Registered Seller
Posts: 676
Joined: May 18th, 2005, 2:14 am
Location: Texas

Re: WIP- 1/2 Studio Scale TOS Battlestar Galactica

#25 Post by DNA »

So I've got one bundle of fibers for the Blue LED chaser and I divide it in half with 16 strands going to both hanger bays.

Image

I just used a small LED flashlight so I can sort out which fibers are going to the right and left hanger bays and I tagged one side with red tape.

Image

Using the styrene tubing again this time for the 8 Blue LEDs. The chaser has 10 LEDs so I taped off the two that I will not be using.

Image

Now I grabbed two fibers from the left and two from the right and encased it in a smaller styrene tubing with aves apoxie sculpt. In the end, there will be 8 smaller styrene tubes with 4 fibers in each.

Image

I trimmed off the excess fibers and slipped them onto the styrene tubing holding the LEDs after the apoxie sculpt had hardened. That's all for now and thanks for looking!

Image
User avatar
DNA
Registered Seller
Registered Seller
Posts: 676
Joined: May 18th, 2005, 2:14 am
Location: Texas

Re: WIP- 1/2 Studio Scale TOS Battlestar Galactica

#26 Post by DNA »

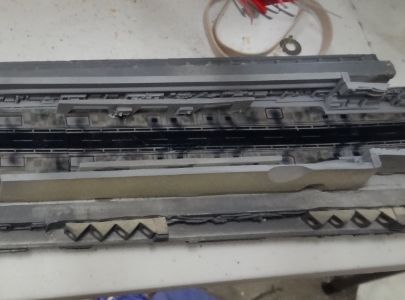
Finishing up the interior of the hanger before I can close up the two halves.

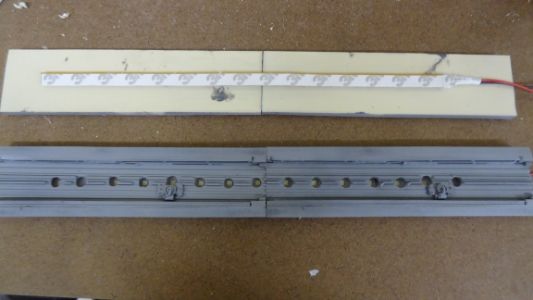
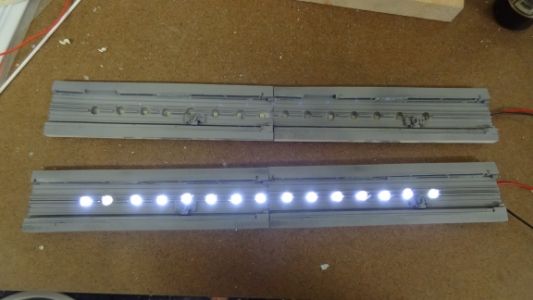
Here are the top of the interior hanger from Randy Cooper's kit. Using a LED strip, marked, and drilled holes for the lights to shine through.
Image

Testing the LEDs with a 9v battery.
Image

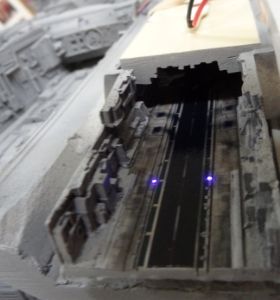
The interior is painted, false walls are up, and floor decals applied.
Image

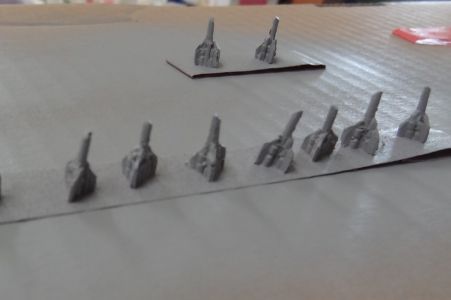
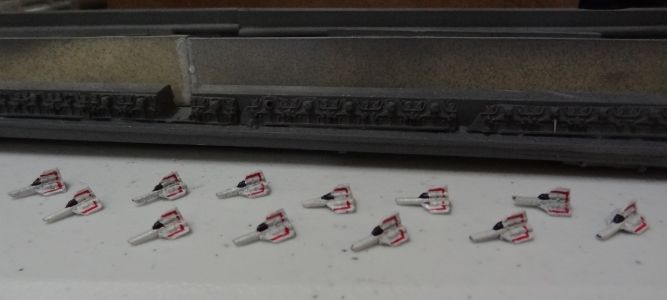
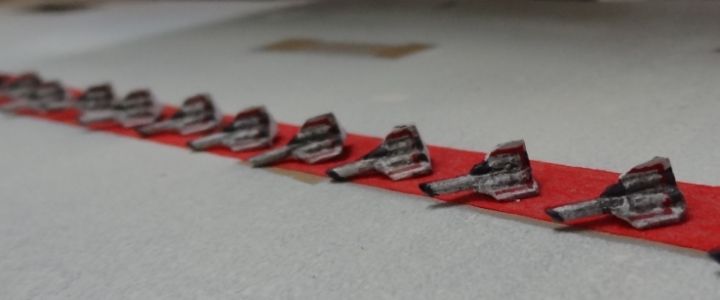
And now onto the tiny vipers. Primed, painted, and weathered...
Image Image Image

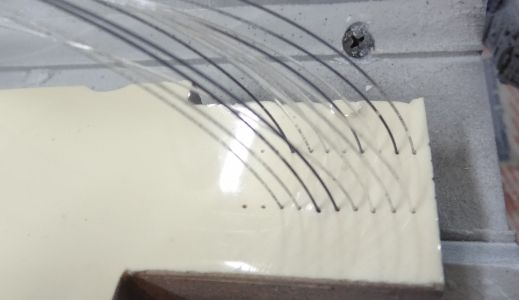
Here the FO for the landing lights are in place. Remember there were 4 fiber optic strands (2 from the right and 2 from the left hangers) encased in epoxie sculpt going into each blue LED chaser. I start the chaser and slowed down the sequence to help me find which two fiber optic strands light up first and put it the holes closest to the entrance. Continue until I have all 8 pairs in order and then glued down with 5 min epoxie.
Image

Testing the landing lights before I glue the two landing bay halves together. Thanks for looking and will update soon!
Image
robiwon
Gone but not Forgotten
Posts: 191
Joined: December 26th, 2009, 1:58 pm

Re: WIP- 1/2 Studio Scale TOS Battlestar Galactica

#27 Post by robiwon »

DNA your'e moving along at speed on this! Great work. You've surpassed me in my build. I took a break before beginning the electronics to work on a few other models. The roles have been reversed and I think I will now be picking your brain. I like the blue runway lights. Mine will be red. I'll be getting back to my build real soon. Any chance we will see you at Wonderfest in KY next year with this?
User avatar
DNA
Registered Seller
Registered Seller
Posts: 676
Joined: May 18th, 2005, 2:14 am
Location: Texas

Re: WIP- 1/2 Studio Scale TOS Battlestar Galactica

#28 Post by DNA »

robiwon wrote:DNA your'e moving along at speed on this! Great work. You've surpassed me in my build. I took a break before beginning the electronics to work on a few other models. The roles have been reversed and I think I will now be picking your brain. I like the blue runway lights. Mine will be red. I'll be getting back to my build real soon. Any chance we will see you at Wonderfest in KY next year with this?
I also took a short break from this build. It's good to take a step back to do other things and come back recharged. Your red LEDs will be cool. I wish there was a chaser that could change colors with a switch. Wonderfest is a pipe dream right now, but I would love to go one day. I plan to take my kids with me but not until they get a little bit older. Got a chance to close up the hangers and will post pics soon. Thanks!
User avatar
DarthVader
Finger Painter
Posts: 67
Joined: July 20th, 2014, 11:06 am
Location: Rouses Point,New York

Re: WIP- 1/2 Studio Scale TOS Battlestar Galactica

#29 Post by DarthVader »

Hello DNA,I was told to check out your build by robiwon and so here I am, I am very impressed by your build as I am also going to be building the Mike Salzo TOS Galactica..

This will be my second kit from Mike which is a amazing kit,I also have all the add on I got from Randy Cooper,I also have Randy Cooper Star Wars Star Destroyer Avenger kit I be building also..

My first kit was not built by me as I am a totally newbie when it comes to work with resin kits or any models.so I am here to learn all I can on modeling..

I am also a member over at RPF and SFMA..

I have been following Mike build and also Robiwon build and been keeping all there pictures for reference so when I start on my build I will have something to go by.

I am going to build mine with LED's Strips and LED's vs Fiber Optics..

I do have a question for you DNA.before you started on you kit what method did you use to wash your kit? also did you do any light blocking before you started doing any assembly if so what did you use?

I am looking forward to more of your updates on your BSG along with Mike and robiwon build..

Clarence
User avatar
DNA
Registered Seller
Registered Seller
Posts: 676
Joined: May 18th, 2005, 2:14 am
Location: Texas

Re: WIP- 1/2 Studio Scale TOS Battlestar Galactica

#30 Post by DNA »

Clarence,

Hi and welcome to the Clubhouse! I usually build resin figure models and they are small enough where I plug up my kitchen sink to wash all the parts there. I had to go to Home Depot and buy a bucket large enough for the largest part of the Galactica to fit into. In any case, I first do all the cleanup needed on the parts mainly removing pour stubs or sanding down mold lines. I then wash all my resin parts with warm water, some dish washing detergent, and an old tooth brush. Rinse, let air dry, and then prime 24 hrs later. I did not do any light blocking before the assembly. I thought there might be some LED light loss in the strands that were in the head so I sprayed them black to minimize any loss (see pic below). I will put foil in the engine block to increase the light intensity of the engine LED lights, but that's it as far as light blocking goes. Good luck with your build and post pics when you get started. Thanks!

Image
robiwon
Gone but not Forgotten
Posts: 191
Joined: December 26th, 2009, 1:58 pm

Re: WIP- 1/2 Studio Scale TOS Battlestar Galactica

#31 Post by robiwon »

DNA, have you decided what color your going to use? Off the shelf color or custom mixed/airbrush?
User avatar
DarthVader
Finger Painter
Posts: 67
Joined: July 20th, 2014, 11:06 am
Location: Rouses Point,New York

Re: WIP- 1/2 Studio Scale TOS Battlestar Galactica

#32 Post by DarthVader »

DNA wrote:Clarence,

Hi and welcome to the Clubhouse! I usually build resin figure models and they are small enough where I plug up my kitchen sink to wash all the parts there. I had to go to Home Depot and buy a bucket large enough for the largest part of the Galactica to fit into. In any case, I first do all the cleanup needed on the parts mainly removing pour stubs or sanding down mold lines. I then wash all my resin parts with warm water, some dish washing detergent, and an old tooth brush. Rinse, let air dry, and then prime 24 hrs later. I did not do any light blocking before the assembly. I thought there might be some LED light loss in the strands that were in the head so I sprayed them black to minimize any loss (see pic below). I will put foil in the engine block to increase the light intensity of the engine LED lights, but that's it as far as light blocking goes. Good luck with your build and post pics when you get started. Thanks!

Image
Thanks DNA,it should not be much longer before I start as you know this back issue I have is just taking longer to heal up,hopefully soon I be able to start on at least one of my kits..

I think I going to completely light block mine as I am pretty sure I be using LED's vs FO on my build..I just need to order my LED's..

Clarence
Last edited by DarthVader on July 21st, 2014, 2:23 pm, edited 1 time in total.
User avatar
DNA
Registered Seller
Registered Seller
Posts: 676
Joined: May 18th, 2005, 2:14 am
Location: Texas

Re: WIP- 1/2 Studio Scale TOS Battlestar Galactica

#33 Post by DNA »

robiwon wrote:DNA, have you decided what color your going to use? Off the shelf color or custom mixed/airbrush?
I started with a gray automotive primer that was kinda dark. I then mist it with tamiya gray fine surface primer which lightened the color drastically. The gray primer looks good but I'm planning on dry brushing white to lighten it up more. I can always come back with a dark wash and pastels to tone everything down.
User avatar
DNA
Registered Seller
Registered Seller
Posts: 676
Joined: May 18th, 2005, 2:14 am
Location: Texas

Re: WIP- 1/2 Studio Scale TOS Battlestar Galactica

#34 Post by DNA »

So here I am closing up the hanger. Randy Cooper's hanger is upside down at this point. Just remember the Galactica is upside down so the entire assembly will need to be flipped over before you close it up.
Image Image

And now the two halves glued down with 5 min epoxie glue. The entrance cap is not glued down yet. It's just there to make sure Randy Cooper's hanger is the right distance.
Image

Now I can glue on the two front hanger caps.
Image

And finally closing up the hanger entrance
Image Image Image

And a shot of the bay lit up! Thanks for looking!
Image
User avatar
DarthVader
Finger Painter
Posts: 67
Joined: July 20th, 2014, 11:06 am
Location: Rouses Point,New York

Re: WIP- 1/2 Studio Scale TOS Battlestar Galactica

#35 Post by DarthVader »

Awesome job DNA,can you tell me what is the size of pipe you used for the stand?

Clarence
robiwon
Gone but not Forgotten
Posts: 191
Joined: December 26th, 2009, 1:58 pm

Re: WIP- 1/2 Studio Scale TOS Battlestar Galactica

#36 Post by robiwon »

DNA, I just have to let you know I hate you. You have now convinced me I need to spend even more on this beast and get all of RC's upgrade parts. Thanks a lot buddy, appreciate it, yeah, thanks!!!!!


:lol:
Seriously though, that looks freakin fantastic!
Vader, he used a 1 inch pipe. I'm using a 3/4 pipe and flange I got at Lowes.
User avatar
tay666
Site Admin
Posts: 18815
Joined: December 8th, 2003, 11:20 am
Location: Conneaut Ohio
Contact:

Re: WIP- 1/2 Studio Scale TOS Battlestar Galactica

#37 Post by tay666 »

Can't believe how much progress you have made so fast.
And the work looks stunning.
Trevor Ylisaari

Check out My Prehistoric Scenes site and forum

"Nothing like a trail of blood
To find your way back home."

WANTED - Bat Rider - produced by Wraiths
User avatar
DarthVader
Finger Painter
Posts: 67
Joined: July 20th, 2014, 11:06 am
Location: Rouses Point,New York

Re: WIP- 1/2 Studio Scale TOS Battlestar Galactica

#38 Post by DarthVader »

robiwon wrote:DNA, I just have to let you know I hate you. You have now convinced me I need to spend even more on this beast and get all of RC's upgrade parts. Thanks a lot buddy, appreciate it, yeah, thanks!!!!!


:lol:
Seriously though, that looks freakin fantastic!
Vader, he used a 1 inch pipe. I'm using a 3/4 pipe and flange I got at Lowes.
Thanks robiwon for letting me know, now I need to get this pipe do you know what the length of the pipe that is being used?I would presume the flange is used inside the BSG so you can adjust the up and down of the pipe correct just want to make sure..

By the way the Randy Cooper B.S.G. LANDING BAYS, DECALS,PLAQUES AND 8 VIPERS! is well worth having that much I am sure off..

http://randycoopermodels.com/content/bs ... d-8-vipers

Clarence
User avatar
DNA
Registered Seller
Registered Seller
Posts: 676
Joined: May 18th, 2005, 2:14 am
Location: Texas

Re: WIP- 1/2 Studio Scale TOS Battlestar Galactica

#39 Post by DNA »

Thanks for the comments Trevor.

Clarence, Robiwon is correct in that I am using a one inch gas pipe. The Flange is screwed into a scrap board for the build. I had two 1 inch gas pipe on hand (one was 12 inches and the other 8 inches). Inside the Galactica is an Iron Coupling which is glued to the ship that looks like this http://www.jmesales.com/catalog/product ... 7AodigwAOg For this build, I am using both pipes one going thru the top and one coming out the bottom. I disconnect the pipe from the Flange to rotate the Galactia when I need to work on the other side. The two gas pipe stays connected to the Iron Coupling for the entire build. I will remove the pipe on the top when the build is finished and cover the hole with the round detail piece. Hope this helps, thanks!
User avatar
DarthVader
Finger Painter
Posts: 67
Joined: July 20th, 2014, 11:06 am
Location: Rouses Point,New York

Re: WIP- 1/2 Studio Scale TOS Battlestar Galactica

#40 Post by DarthVader »

DNA wrote:Thanks for the comments Trevor.

Clarence, Robiwon is correct in that I am using a one inch gas pipe. The Flange is screwed into a scrap board for the build. I had two 1 inch gas pipe on hand (one was 12 inches and the other 8 inches). Inside the Galactica is an Iron Coupling which is glued to the ship that looks like this http://www.jmesales.com/catalog/product ... 7AodigwAOg For this build, I am using both pipes one going thru the top and one coming out the bottom. I disconnect the pipe from the Flange to rotate the Galactia when I need to work on the other side. The two gas pipe stays connected to the Iron Coupling for the entire build. I will remove the pipe on the top when the build is finished and cover the hole with the round detail piece. Hope this helps, thanks!
Thanks DNA,it looks like I will need to make a trip to Lowes or Ace Hardware to see if they have these pieces,I pretty much need all the bolts,nuts and screws to build mine similar to your build,I just need to figure what bolts sizes I will need to connect everything,I have some scrap wood but I have no hardware..

Clarence
Post Reply