

Then 3d printers came along and opened up new possibilities. FDM could easily produce the very square and true parts, but the finish left a lot to be desired and would require a lot of post processing. Resin printers can produce much higher quality finishes but there's a big caveat when trying something like this - you can get a perfect finish on the top surface and sides of a print, but underneath where supports are needed it can be a real uneven mess! Angling the pieces just right can alleviate much support requirement, but at the cost of a fine stair-stepped finish on the parts you want flat due to the physical resolution of the printer.
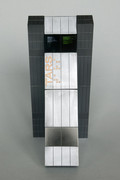
Meanwhile as a result of another long-term and still stalled project to fit out the Moebius 2001 EVA Pod with working screens, I obtained some much smaller 1.1" screens in portrait format that were absolutely perfect for an exact 1/9th scale TARS - down from what was going to be about 1/7th with the original LCD. This resulted in a much better design for all the body parts which in turn provided for some less damaging support options. The body was printed as 2 parts split at the waist and the arms in 2 parts also. With just the right angling I was able to get a relatively good surface finish on all sides and only a tiny bit of deformation along the joining edges. The top half of each part had an internal protrusion that fitted snugly into the bottom half. The arms could be glued together, but the body needed to remain separable to allow access to the battery box which lived inside the lower half. These parts were held in place with magnets.
The PCB with the 2 screens was inserted into the top half, located in place via some pegs on the inside that matched up with holes on the PCB and then held in place with a piece of sponge! Secure enough but easily removable if necessary.
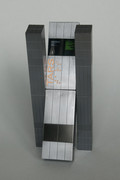
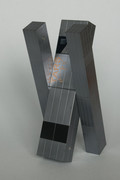
Magnets were also added to wells along the sides of the body and arms to allow for movement just like the real TARS, with these allowing a variety of changeable poses.
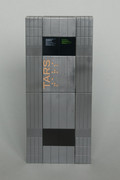
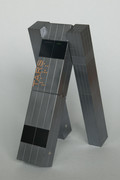
The overall finish was with Humbrol Metalcote - an old style buffable enamel that gives a nice polished metal finish. I had done some tests using a variety of metallics including Alclad and Mr Colour Metal and the Metalcote gave by far the best result in the tests. Or so I thought. When I came to finally paint the finished model the results were nowhere near as good as my test piece! I'm really confused, I'm certain I used the same paint and the same undercoat but it's just not as good.
To finish it off, a small rectangle of smoked acrylic sheet sits over the screens to blend them in with the rest.
In all a lot of effort for a relatively simple looking piece. There's still things I'd tweak or change, I'm still not totally happy with the part joins not being totally as clean as I'd like so I may go back and revisit at some point. I have some more ideas....

A rough animated GIF showing the screens in action - I don't have video upload capabilities at the moment...


