posted here a while ago. They were all pretty challenging but good fun too, so it’s time to get this one across the finish line.
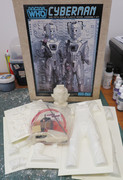
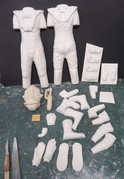
Starting with some shots of the box and parts for those who’ve not built one of these kits before, the usual blend of vac form styrene,
resin and various detail bits and pieces.
First job was to score and snap away the main parts from their backing sheets.
When you look at the spread of trimmed parts, it certainly makes you wonder how these things are priced at £250
or more on evil bay. I got this one for around £90 which is certainly more sensible but still a lot of money for a box of
sheet styrene, plastic pipes and wire, but hey, it is an antique!
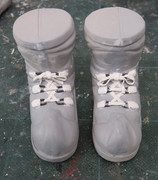
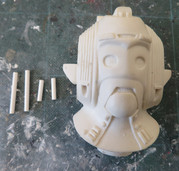
The main torso halves were glued together with the help of styrene tabs made from scrap sheet plastic, as were the boots.
I filled the boots with Milliput to give them weight and also something I could drill into later to pin him to a base of sorts later.
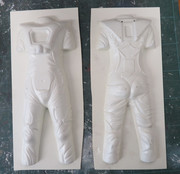
The legs of the figure were filled with Plaster of Paris to add weight and more stability.
A lot of filling and sanding was required to get the seems blended in, especially across the shoulder armour, although I
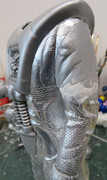
wasn’t too critical of the boiler suit sides as I have decided to try and skin all of the fabric areas with aluminium foil.
I’ve seen similar techniques used for bare metal model aircraft, so I thought why not try it here rather than spray it
with silver paint. I plan to use the foil with the underside facing outwards, as this is less shiny and should be a good match
for the TV props. Looking at reference photos, the suits are quite wrinkled and creased, so foil should give a similar effect,
at least that’s the theory!
The boots have the lace connections moulded into them, but no laces, so I had a go at adding them with wire and putty.
Quite hilarious thinking of a Cyberman lacing up his boots before going into action, but it looks like this was the state of
fashion on the props.
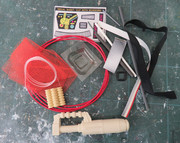
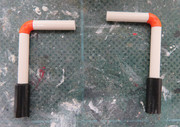
I then added some more details to the Cybergun with styrene strip, preferring the 3d effect to the paper decals supplied.
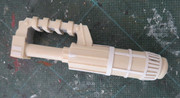
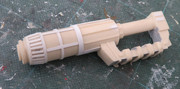
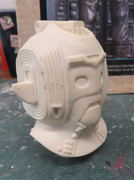
The iconic handles on the side of the head were more of a challenge than they should be, mainly as it’s not mentioned in the instructions
what to use for the connection points on the top curved corners. It just tells you to cut the styrene rod into the lengths required and then
press them together! Rummaging through the bag of details, I found a small blister pack holding the two tiny connectors,
blink and you will miss them.
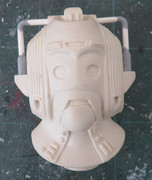
Crude but effective, the base of the pipes were then wrapped in electricians insulation tape. This is to make the diameter of the pipes
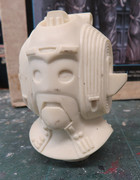
thick enough to fit the location points on the helmet, which is a well detailed but rather heavy resin item. I gave the handle joints a
few coats of Mr Surfacer 500 to smooth out the bumps.
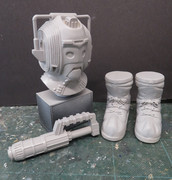
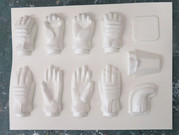
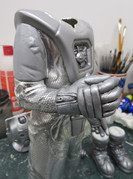
I decided to try and sculpt some new gloves, as the vac formed hands are very crude. I fashioned a mitten out of tin foil and then coated this
with Super Sculpey Firm, then gradually pulled this into shape an detailed it with various tools.
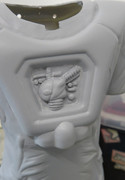
While I had the Sculpey out, I also had a go at making the Cyberman chest details, which I guess are supposed to be a heart of some kind?
Either way, it should look better under a coat of paint and the transparent covering than the paper decal supplied.
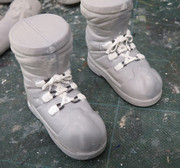
With everything primed I got the head, gun and shoulder armour sprayed silver an the boots and gloves flat aluminium,
to suggest the different materials.
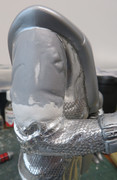
I then started the skinning process with the aluminium foil. Sheets were cut to fit, sprayed with spray mount and burnished into the details on the
plastic surface. Very time consuming but it worked, I then attached the hands which I had sculpted from polymer clay, followed by the mesh panels
around the arms, legs and torso. The arms were then glued on and faired into the upper arms with milliput. Once dry, the upper arms were skinned with
foil and all blended in.

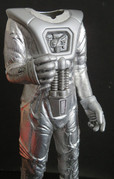
The tubes and piping came next, cutting the wires to fit and then attaching with good old Uhu glue. This was quite fiddly and came with a generous
helping of expletives, especially the spring clad tube running from the chest unit to the rear, but finally got it all sorted! The boots were then attached,
extending the tops of them with more milliput so the trousers could tuck down into them properly.
With him standing on his feet, the end was in sight. To make the gun strap, I fashioned the ends of the ribbon provided into narrow strips using Uhu.
I then made a hole at each end with a sewing needle and pushed these over the buttons at either end of the gun handle, fixing them with
super glue and plastic rod covers.
Finally, I attached the head with 5 minute epoxy, plugged in the transparent wires to the sides and then into the back of the neck.
Black and gun metal acrylic washes were run around the edges of gloves, boots, armour, folds and creases and he was finished.
I then made a simple box base with black styrene sheet, adding 2 lumps pf milliput inside to provide something to drill brass rods into from the top surface.
These in turn went into corresponding holes in his heels, ensuring he wasn’t going the fall over. I sprayed the base with Humbrol acrylic Polished Steel
which improved the finish.
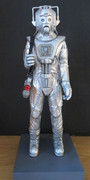
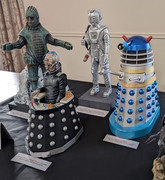
As usual with my other Sevans builds, this one pushed my modelling skills and patience levels, but I’m pleased with the final result and it was
great to have him on the display at the Space Crafts model show with the other three villains! More pics of the finished build in the Museum.